dimanche 29 avril 2018

Fly Free - Paper Issues


Bonjour!

J'espère que vous passez un bon weekend! Je suis de passage aujourd'hui pour partager une nouvelle page réalisée pour la Spring Crop de Paper Issues. Cette fois, je me suis inspirée du Create a Cluster challenge et j'ai utilisé la belle collection The Bright Side de Fancy Pants ainsi qu'une photo toute récente de ma petite dernière sur la balançoire.

Hi!

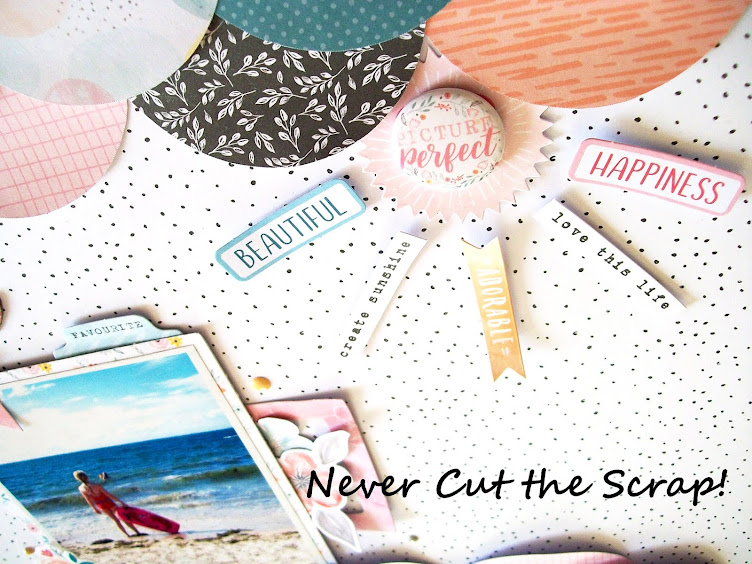
I hope you're having a great weekend! I'm popping in today to share a new layout that I made for the Paper Issues Spring Crop. I played along with the Create a Cluster challenge and used the beautiful The Bright Side collection by Fancy Pants along with a spring photo of my little one on the swing.


Pour le fond, j'ai choisi le joli papier Natural Beauty et j'ai décidé d'utiliser le motif floral comme base pour mon cluster. J'ai matté la photo avec quelques feuilles du paper pad et je l'ai collée sur le papier de fond avec de la mousse 3D. J'ai ensuite relié la photo et le motif floral du fond avec de belles fleurs de l'ephemera pack.

For the background, I went with the pretty Natural Beauty paper and decided to use the floral pattern to create my cluster. I backed the photo with a couple of papers from the 6x6 pad and adhered it on the background with foam squares. I then joined the photo and the floral pattern of the background paper with lovely flowers from the ephemera pack.


J'ai ajouté des découpes de la collection sur et autour de la photo et j'y ai également glissé un onglet avec la date. Pour le titre, j'ai utilisé des autocollants en chipboard que j'ai placés sur une bannière de l'ephemera pack. Enfin, j'ai terminé mon cluster avec quelques enamel shapes de la collection.

Next, I added pretty die cuts on and around the photo and tucked a tab with the date under it. For the title, I used chipboard stickers that I placed on a cute scallop die cut. Finally, I completed my photo cluster with shiny enamel shapes.


Retrouvez tous les challenges de la Spring Crop dans le groupe Facebook de Paper Issues! Il reste encore toute une semaine pour participer!

Head over to the Paper Issues Facebook group for more fun crop challenges! You still have one more week to play along!


Merci beaucoup d'être passé et bonne fin de weekend!

Thanks so much for stopping by! Happy Sunday!


Elodie


samedi 28 avril 2018

Yesss - Paper Issues


Bonjour à tous!

La Spring Crop de Paper Issues bat son plein et j'ai une nouvelle page à partager réalisée pour le Let's Celebrate Cassie challenge. Pour ce challenge en l'honneur de Cassie Box, il faut réaliser un projet avec des rayures, des superpositions, des pois, des couleurs vives ou encore de la twine. Pour ma page, j'ai utilisé la collection Sunshine & Good Times d'Amy Tangerine et American Crafts ainsi qu'une photo des filles devant une fresque colorée de Belfast l'année dernière.

Hi everyone!

The Paper Issues Spring Crop is in full swing and I have a new crop layout to share with you today. I was inspired by the Let's Celebrate Cassie challenge that is all about creating a project using stripes, layers, dots, bright colors or twine in the style of Cassie Box. For my layout, I used the Sunshine & Good Times line by Amy Tangerine & American Crafts and a colorful photo of my girls in front of a mural in Belfast last year.


J'ai commencé par découper des bandes en bas de plusieurs feuilles 30x30 de la collection. Je les ai recourbées légèrement pour apporter du relief et je les ai collées sur le papier de fond. J'ai ensuite matté la photo avec plusieurs feuilles du paper pad et un napperon et je l'ai placée sur mes bandes avec des carrés de mousse 3D. Je l'ai ornée de fleurs, d'un fanion et d'onglets découpés dans le paper pad.

I started by cutting strips at the bottom of several 12x12 papers. I folded them up a bit for dimension and adhered them on the background paper. Next, I backed the photo using colorful papers from the 6x6 pad and a doily from my stash and I placed it on the strips with foam squares. I then adorned it with a pennant, flowers and tabs that I cut in 6x6 papers.


Pour le titre, j'ai utilisé un mot autocollant de la collection que j'ai coupé en deux et que j'ai placé le long d'une bande de part et d'autre de la photo. J'ai terminé ma page en parsemant le fond de boutons en bois Artemio, d'enamel dots et de cœurs autocollants de la collection Millie & June de Fancy Pants.

For the title, I used a puffy word from the Sunshine and Good Times Thickers pack that I cut in half and that I placed along the top strip on either side of the photo. I finished my layout by scattering Artemio wood buttons and Fancy Pants puffy shapes on the page.


J'adore le style de Cassie et je me suis beaucoup amusée à faire cette page colorée! Pour participer vous aussi et retrouver les autres challenges de la Spring Crop, rendez-vous dans le groupe Facebook Paper Issues Friends and Fans!

I love Cassie's style and I had so much fun making this colorful page! Head over to the Paper Issues Friends and Fans Facebook group to join in the fun! See you there!


Merci d'être passé par ici et à très vite!

Thank you for joining me today! Have a great day!


Elodie


vendredi 27 avril 2018

Color Me Your Color - Paper Issues


Bonjour!

La Spring Crop de Paper Issues démarre aujourd'hui dans le groupe Facebook Paper Issues Friends and Fans avec de nombreux challenges et des prix à gagner! J'ai été inspirée par le Name That Tune challenge pour lequel il faut réaliser un projet où figurent des paroles de chanson. J'ai utilisé la collection Stay Colorful de Dear Lizzy et American Crafts, une photo des filles dans la piscine gonflable il y a quelques années ainsi que des paroles de la chanson "Call Me" de Blondie.

Hi friends!

Are you ready to crop till you drop? The Paper Issues Spring Crop is starting today in the Paper Issues Friends and Fans Facebook group with a lot of fun challenges and prizes too! I played along with the Name That Tune challenge and used lyrics from "Call Me" by Blondie on my layout. I also used the Stay Colorful collection by Dear Lizzy & American Crafts and a summer photo of the girls having fun in the pool a couple of years ago.


J'ai découpé une bande dans la jolie feuille Dream On et je l'ai placée à gauche du papier Radical que j'ai choisi pour le fond. J'ai ensuite collé la photo sur la bande avec des carrés de mousse 3D, j'y ai glissé un napperon et je l'ai ornée d'un papillon de l'ephemera pack et d'un bouton en bois Artemio.

I fussy cut a large strip in the pretty Dream On sheet and placed it on the left side of the Radical paper that I chose for my background. Then I adhered the photo on the strip with foam squares, tucked a doily under it and I adorned it with a cute butterfly from the ephemera pack and an Artemio wood button.


J'ai ensuite superposé des embellissement de la collection à droite de la bande: des fleurs découpées dans la feuille Groovy, des die-cuts et des autocollants. Pour le titre, j'ai utilisé des Thickers noirs de la collection Saturday de Dear Lizzy que j'ai placés à droite de la page le long des embellissements. J'ai également remplacé un "o" par des cœurs autocollants. Enfin, j'ai terminé ma page en ajoutant des puffy dots Millie & June de Fancy Pants et quelques enamel shapes de la collection You Rock de Cocoa Vanilla Studio.

Next, I layered beautiful Stay Colorful embellies on the right-hand side of the scallop strip: fussy cut flowers from the Groovy paper, die cuts and stickers. For the title, I used black Thickers from the Dear Lizzy Saturday line and a couple of heart stickers and I placed them on the right side of the page, all along the embellishments. I put the final touch to my layout with puffy dots from the Fancy Pants Millie & June collection and a couple of enamel shapes from the You Rock line by Cocoa Vanilla Studio.


Rejoignez-nous dans le groupe Facebook de Paper Issues pour participer et découvrir les autres challenges de la Spring Crop! 

Join us in the Paper Issues Facebook group to play along and check out all the fun Spring Crop challenges!


Merci de votre visite et bonne journée!

Thank you for stopping by today! Have a great day!


Elodie


lundi 23 avril 2018

Wander - Pink Paislee


Bonjour à tous!

Je commence cette nouvelle semaine avec une page que vous pouvez retrouver aujourd'hui sur le blog de Pink Paislee. Ces deux prochaines semaines, nous allons mettre l'accent sur la nouvelle et magnifique collection Auburn Lane. Pour mon premier projet avec cette belle collection, j'ai fait une page automnale avec une photo des filles en balade dans les rues de notre village.

Hi everyone!

I'm starting this new week with a layout that is up today on the Pink Paislee blog. It's going to be all about the new and stunning Auburn Lane collection over the next two weeks. For my first project with this beautiful line, I made a fall page with a photo of my girls wandering in our village during an October walk.


Tout d'abord, j'ai passé en revue les papiers de la collection pour choisir le fond. Ils sont tous superbes et j'ai eu un peu de mal à me décider! J'ai finalement opté pour le papier 02 et son beau motif bois. Parfait pour aller avec ma photo d'automne!

I started by going through the Auburn Lane patterned papers to pick my background. The papers in this line are all gorgeous and I had a hard time choosing one! I finally went with Paper 02 and its beautiful woodgrain pattern. It just screams fall and would be perfect with my autumn picture.


Je me suis également arrêtée sur le joli papier 07 que j'ai décidé de découper en suivant les triangles. J'ai placé mes triangles en papier en haut et en bas de la page et j'ai recourbé légèrement les bords avant de les coller pour apporter du volume. J'adore l'impact que ces triangles concentriques donnent à ma page.

When I was looking at all the patterned papers, I also came across the pretty Paper 07. I decided to use it on my layout and to fussy cut it following the triangle pattern. I placed my paper triangles at the top and at the bottom of the page and folded up the edges before sticking them down for dimension. Those concentric triangles make such a striking design!


J'ai matté la photo avec une feuille du paper pad et je l'ai collée sur les triangles du haut avec des carrés de mousse 3D. J'ai ensuite complété mon cluster avec de jolis embellissements de la collection: des die-cuts que j'ai glissés sous la photo, un onglet avec des autocollants pour la date, de belles fleurs et feuilles ainsi que des autocollants.

I backed the photo using a paper from the 6x8 paper pad and adhered it on the top triangles with foam squares. I completed my top cluster with pretty Auburn Lane embellishments: die cuts that I tucked under the pic, a tab with stickers for the date, gorgeous flowers and leaves from the floral embellishment pack, as well as puffy and cardstock stickers.


J'ai également placé un beau cadre en bois sur la photo. J'aime la façon dont il attire l'attention sur ma photo!

I also placed a beautiful wood veneer frame on the picture. I love how it draws the eye to my photo!


Je suis ensuite passée au bas de la page. J'ai utilisé un autocollant en cardstock pour le titre et je l'ai placé dans un joli cadre de l'ephemera pack que j'ai orné de fleurs et de feuilles. Pour apporter un peu d'éclat et de texture à ma page, j'ai ajouté des transferts dorés près de quelques embellissements et j'ai terminé ma page d'automne avec des enamel dots et des sequins du mixed embellishment pack.

I then moved on to the bottom of the page. I used a cardstock sticker for the title and placed it in a lovely frame from the ephemera pack that I adorned with flowers and leaves. To give a bit of shine and even more texture to my layout, I added cute rub-on stars around some embellies and finished my fall page with enamel dots and sequins from the mixed embellishment pack.


J'adore cette collection et je suis sûre que vous l'aimerez vous aussi! Merci de vous être joint à moi aujourd'hui et à bientôt!

I'm swooning over this amazing collection and I'm sure you will fall in love with it too! Thank you for joining me today! Have a beautiful day!


Elodie


dimanche 22 avril 2018

Hello Lovely - Paper Issues


Bonjour!

J'espère que vous passez un excellent weekend! J'ai une nouvelle page à partager avec vous aujourd'hui réalisée pour le Scraplift Sunday de Paper Issues. Cette semaine, nous liftons une belle page de Courtney Sawyer. J'ai utilisé la collection Flourish de Maggie Holmes et Crate Paper ainsi qu'une photo de ma fille aînée alors âgée d'un peu moins de deux ans. Voici mon lift!

Hi everyone!

I hope you're having a great weekend! I have a new layout to share with you today that I made for Paper Issues' Scraplift Sunday. This week, we're lifting a beautiful page by Courtney Sawyer. I used the Flourish collection by Maggie Holmes and Crate Paper as well as a photo of my oldest girl back when she was 2 years old. Here is my lift!


Et voici la page de Courtney!
And here is Courtney's layout!


Tout d'abord, j'ai cousu un cadre avec du fil noir sur le papier de fond. J'ai découpé plusieurs bandes dans le paper pad Flourish, j'ai cousu les bords de certaines d'entre elles et je les ai placées au centre de la page.

I started by hand stitching a frame on the background paper with black thread. I cut several strips in papers from the Flourish 6x6 pad, I stitched the borders of a couple of them and placed them in the center of the page.


J'ai matté la photo avec une autre feuille du paper pad et je l'ai collée sur mes bandes avec de la mousse 3D. Pour le titre, j'ai utilisé une découpe en calque de l'ephemera pack ainsi qu'un bouton en bois Artemio. Pour rappeler les découpes blanches de la page de Courtney, j'ai glissé deux napperons sous mes bandes de papier.

I matted the picture with another 6x6 paper and adhered it on the strips with foam squares. For the title, I used a vellum piece from the Flourish ephemera pack as well as an Artemio wood button. To echo the white cut files on Courtney's page, I tucked a couple of doilies under my paper strips.


Je suis ensuite passée à  la partie embellissement. J'ai placé des mots autocollants de la collection Chasing Dreams ainsi que des die-cuts Flourish sur les bandes de papier. J'ai également ajouté quelques papillons découpés dans le paper pad Flourish et des puffy dots de la collection Millie & June de Fancy Pants. Enfin, j'ai apporté la touche finale à ma page avec des gouttes d'encre noire.

Then I moved on to the embellishing and added a couple of pretty fussy cut butterflies from the Flourish 6x6 pad as well as puffy dots from the Fancy Pants Millie & June line. I also placed Flourish die cuts and word stickers from the Chasing Dreams collection on the paper strips. Finally, I put the finishing touch to my layout with droplets of black ink.


Rendez-vous dans le groupe Facebook Paper Issues Friends and Fans pour participer et avoir une chance de gagner un bon d'achat à valoir dans la boutique Paper Issues! Merci de votre visite et à très vite!

Head over to the Paper Issues Friends and Fans Facebook group to play along and share your lifts! You could win a gift card to the Paper Issues store! Thank you for joining me today! Have a lovely day!


Elodie


jeudi 19 avril 2018

Baby Girl Cards - Pink Paislee


Bonjour!

Vous pouvez me retrouver aujourd'hui avec un tout nouveau projet sur le blog de Pink Paislee! Cette semaine a pour thème les couleurs pastels et j'ai décidé de réaliser des cartes de naissance avec la superbe collection Pick-Me-Up.

Hi!

It's my turn to share a new project today on the Pink Paislee blog! This week is all about pastels and I decided to make a set of baby cards using the gorgeous Pick-Me-Up collection.


J'ai commencé par passer en revue la collection Pick-Me-Up à la recherche d'éléments aux couleurs douces. Mon choix s'est principalement porté sur des papiers et embellissements roses. J'aime beaucoup les tons roses de cette collection que je trouve délicats et doux. Juste ce qu'il me fallait pour mes cartes de naissance!

I started by going through my Pick-Me-Up supplies and picking items with soft colors. I mainly went with pink papers and embellies. I love the pink tones in the Pick-Me-Up collection. They're so delicate and pretty! Just what I needed for my baby girl cards!


Pour les bases de mes cartes, j'ai utilisé des feuilles du paper pad que j'ai pliées en deux. Simple et efficace!

For the base, I used papers from the 6x6 pad that I folded in half. So easy!


J'ai ensuite fait de jolies superpositions sur le dessus de mes cartes avec des rectangles ainsi que des moitiés de cœurs et de papillons que j'ai découpés dans plusieurs feuilles du paper pad. J'ai cousu les bords du cœur et du papillon les plus petits avec du fil blanc pour ajouter plus de détails et de texture à mes cartes.

Then I made lovely layers on the top of my cards using rectangles as well as half hearts and butterflies that I cut in more 6x6 papers. I hand stitched the edges of the smaller heart and butterfly with white thread to add detail and texture to my cards.


Pour les titres, j'ai utilisé des Thickers blancs de la collection que j'a placés sur les bords du cœur et du papillon du dessus. J'aime la douceur qu'apportent ces Thickers blancs à mes cartes!

For the sentiments, I used some of the cute white foam Thickers that I placed along the stitched edges of the top heart and butterfly. I love the soft and delicate look those white Thickers bring to my cards!


J'ai terminé mes cartes de naissance en ajoutant de jolis embellissements de la collection: des die-cuts, des autocollants, des sequins et quelques boutons. J'ai collé certains éléments avec des la mousse 3D pour plus de relief.

I finished my baby cards by adding pretty Pick-Me-Up embellies: die cuts, stickers as well as sequins and cute buttons from the haberdashery pack. I adhered some of them with foam squares to add dimension to my sweet cards.


J'ai adoré faire ces cartes toutes douces avec la collection Pick-Me-Up! J'espère qu'elles vous donneront envie de vous amuser avec cette belle collection! Merci d'être passé par ici et à bientôt!

I loved making these soft cards with the colorful Pick-Me-Up collection that can be used in so many ways. I hope they inspire you to have fun with this beautiful line! Thanks so much for stopping by! Have a wonderful day!


Elodie


mardi 17 avril 2018

Hello Awesome - Cocoa Vanilla Studio


Bonjour à tous!

J'espère que votre semaine a bien démarré! Je commence la mienne avec une nouvelle page que vous pouvez retrouver aujourd'hui sur le blog de Cocoa Vanilla Studio. Cette semaine, nous mettons les projets masculins à l'honneur. Pour ma page, j'ai utilisé la collection You Rock ainsi qu'une photo de ma petite dernière dans les bras de son papa.

Hi friends!

I hope your week is off to a great start! I'm sharing a new layout on the Cocoa Vanilla Studio blog today. This week is all about masculine projects. For my page, I used the awesome You Rock collection and a photo of my youngest girl with her dad.


Je n'avais pas utilisé cette collection depuis un moment et j'étais très contente de la redécouvrir. Je suis partie sur du noir et blanc pour le fond et j'ai choisi les beaux papiers Night Sky et Random. J'ai coupé deux bandes dans la feuille Night Sky et je les ai placées de chaque côté du papier Random.

I haven't used this line in a while and I was excited to play with it again! I went with black and white for the background and picked the beautiful Night Sky and Random papers. I cut two strips in the Night Sky sheet and placed them on each side of the Random paper.


J'ai commencé par le côté gauche et j'ai collé la photo en haut de la page avec de la mousse 3D pour la mettre en avant. J'ai ensuite ajouté des embellissements de la collection le long de la bande de papier Night Sky: des étoiles découpées dans la feuille Starshine, des die-cuts, des découpes en bois et une étoile en chipboard. J'adore la façon dont les embellissements colorés ressortent sur le fond noir et blanc!

I started with the left-hand side of the page and adhered the photo at the top with foam squares to make it pop. I then added You rock embellies all along the Night Sky strip: fussy cut stars from the Starshine paper, die cuts, wood veneer pieces, and a cute chipboard star. I love how the bright embellishments pop against the black and white background!


J'ai également orné la photo de quelques étoiles, d'un die-cut et d'une autre étoile en bois. J'ai collé certains embellissements avec des carrés de mousse 3D pour apporter du volume à la page.

I also adorned the picture with a couple of fussy cut stars, a die cut from the ephemera pack and another wood veneer star. I adhered some embellies with foam squares to bring dimension to the page.


Je suis ensuite passée au côté droit de ma page et j'a complété le titre avec un autre mot en bois que j'ai placé le long de la bande noire. Ces découpes en bois sont parfaites pour apporter un peu de relief et de chaleur à un projet!

Next, I moved on to the right side of my layout and completed the title with another wood veneer word that I placed along the black paper strip. Those wood veneer pieces are great to add dimension and warmth to a project. Love them!


J'ai glissé un cadre de l'ephemera pack sous le mot en bois et j'ai ajouté des étoiles et des die-cuts tout autour. Enfin, j'ai disséminé des enamel shapes sur ma page pour apporter encore plus de couleurs.

I tucked a bright frame from the ephemera pack under the wood veneer word and created a cluster around it with more stars and die cuts. To add more color and fun to my layout, I scattered enamel shapes on the page.


J'ai adoré faire cette page masculine et retrouver la collection You Rock! J'espère qu'elle vous donnera envie de replonger dans vos anciennes collections Cocoa Vanilla Studio! Merci de vous être joint à moi et bonne journée!

I had so much fun making this masculine page and playing again with the fantastic You Rock collection! I hope it inspires you to create with older CVS lines too! Thank you for joining me today! Have an awesome day!


Elodie


samedi 14 avril 2018

Sparkle & Shine - Paper Issues


Bonjour!

Je suis de retour avec une nouvelle page que vous pouvez retrouver aujourd'hui sur le blog de Paper Issues. J'ai participé au Notable Quotable challenge d'avril et je me suis inspirée des fleurs mais aussi de la citation pour mon titre. J'ai utilisé la belle collection Be You de Pinkfresh Studio ainsi qu'une photo de ma petite dernière. Voici ma page!

Hi everyone!

I'm back with a new layout that is up today on the Paper Issues blog. I played along with the Notable Quotable challenge and took inspiration from the flowers and also from the quote for my title. I used the beautiful Be You collection by Pinkfresh Studio along with a photo of my little miss sunshine. Here is my page!


Et voici la citation d'avril!
And here is the April quote!


Pour le fond, j'ai choisi le papier Real avec sa jolie bordure de fleurs. Parfait pour aller avec cette citation printanière! J'ai cousu deux cercles concentriques sur le papier de fond avec du fil bleu foncé. J'ai ensuite matté la photo avec une feuille du paper pad et je l'ai collée à gauche de la page avec des carrés de mousse 3D.

For the background, I picked the Real paper with its pretty floral border. Perfect to go with this spring-inspired quote! I hand stitched two concentric circles on the background paper using dark blue thread. I then backed the photo with a paper from the 6x6 pad and adhered it on the left-hand side of the page with foam squares.


J'ai glissé un napperon sous la photo ainsi que quelques embellissements de la collection: des découpes, un joli nœud et un onglet sur lequel j'ai tamponné la date. Pour le titre, j'ai utilisé des lettres autocollantes de la collection et je les ai placées le long du petit cercle.

Next, I tucked a doily under the picture, along with some Be You die cuts, a cute tassel bow and a tab on which I stamped the date. For the title, I used shiny puffy alpha stickers from the range and placed them along the smaller circle.


Je suis ensuite passée au grand cercle que j'ai orné de jolis embellissemenst Be You: des puffy stickers, des boutons en bois, des die-cuts et deux papillons que j'ai découpés dans des feuilles du paper pad. J'ai collé quelques embellissements et la photo avec de la mousse 3D pour plus de relief. J'ai terminé ma page avec des étoiles et des losanges autocollants de la collection.

Then I moved on to the big circle and adorned it with pretty Be You embellies: puffy stickers, wood and epoxy buttons, die cuts and a couple of butterflies that I cut in 6x6 papers. I adhered some embellies and the photo with foam squares for dimension. I finished my layout with puffy diamond stickers and stars from the alpha sticker sheet that I scattered on the page.


Rejoignez-nous dans le groupe Facebook Paper Issues Friends and Fans pour participer et découvrir les autres challenges d'avril! Vous aurez peut-être la chance de gagner un bon d'achat à valoir dans la boutique Paper Issues! Merci de votre visite et bon weekend!

Join us in the Paper Issues Friends and Fans Facebook group to play along and check out all the fun April challenges! You could win a gift card to the Paper Issues store where you can find beautiful Pinkfresh Studio goodies, along with a lot of pretty supplies! Thank you for visiting my blog today! Have a great weekend!


Elodie


vendredi 6 avril 2018

Bloom - Pink Paislee


Bonjour!

Je termine la semaine avec une page que vous pouvez retrouver aujourd'hui sur le blog de Pink Paislee. Cette semaine est consacrée à un thème que j'affectionne particulièrement: les fleurs. Je me suis donc lâchée et j'ai utilisé beaucoup de fleurs autocollantes du #StickerBook de Päige Evans sur ma page ainsi qu'une photo printanière de ma petite dernière dans notre jardin il y a quelques années.

Hello!

To finish the week, I have a new Pink Paislee layout to share with you today. It's all about flowers this week on the Pink Paislee blog and I love using flowers on my projects! So I went wild with flowers on my page using floral stickers from the Paige Evans #StickerBook and a spring photo of my youngest daughter wandering in our garden a few years ago.


Le #StickerBook de Paige Eavns est rempli de jolies fleurs et je les ai presque toutes utilisées sur ma page. Je les ai mattées avec du cardstock blanc et je les ai placées sur le papier 24 de la collection Turn the Page de manière à former un cadre.

The Paige Evans #StickerBook is full of beautiful flowers and I used a lot of them on my layout. I backed them with white cardstock and placed them on Paper 24 from the Turn the Page collection so as to get a frame.


J'ai collé les fleurs avec de la mousse 3D pour apporter du volume à ma page. J'adore les contours blanc autour des fleurs qui les font ressortir encore plus sur le fond bleu!

I adhered the flower stickers with foam squares to bring dimension to the page. I love the white outlines around the flowers that make them pop even more against the pretty blue background!


J'ai ensuite ajouté la photo dans le coin inférieur droit de mon cadre. Pour le titre, j'ai utilisé des Thickers blancs de la collection Pick-Me-Up pour rappeler les contours blancs des fleurs et de la photo. J'aime beaucoup la douceur qu'apportent les éléments blancs à ma page!

Next, I added the photo on the bottom right-hand corner of my floral frame. For the title, I used cute white foam Thickers from the Pick-Me-Up line to echo the white outlines on the flowers and on the picture. I really like the soft look the white bits give to my layout!


J'ai complété ma scène printanière avec de jolies découpes en bois de la collection Turn the Page que j'ai placées dans le cadre. J'ai également ajouté un papillon autocollant Turn the Page en bas du cadre et j'ai décoré quelques découpes en bois avec des fleurs autocollantes.

I completed my spring scene with pretty Turn the Page wood veneer pieces that I placed inside the frame. I also added a lovely butterfly from the Turn the Page puffy sticker sheet at the bottom of the frame and adorned some wood veneer pieces with puffy flower stickers.


Pour finir, j'ai parsemé ma page de sequins en forme de fleurs de la collection Turn the Page.

Finally, I scattered Turn the Page flower sequins all around the page and my garden scene was complete!


J'espère que cette page fleurie vous donnera envie d'utliser les autocollants du #StickerBook de Paige Evans sur vos projets! Merci beaucoup de votre visite et bon weekend!

I hope this spring page inspires you to go wild with flowers and use the pretty stickers from the Paige Evans #StickerBook on your layouts! Thanks so much for visiting my blog today! Wishing you a lovely day and a great weekend!


Elodie