lundi 31 décembre 2018

Best 16 of 2018


Hi friends!

I hope you're enjoying the holidays! For the last day of the year, I'd like to share my favorite projects from 2018 with you. Here they are!

Bonjour à tous!

J'espère que vous passez de joyeuses fêtes! Pour le dernier jour de l'année, j'aimerais partager mes projets préférés de 2018 avec vous. Les voici!


I made this winter page with the beautiful Whimsical collection by Paige Evans and Pink Paislee. I used paper snowflakes to create a dreamcatcher and I embellished it with pretty Whimsical die cuts and stickers. I love how soft this layout looks!

J'ai fait cette page hivernale avec la belle collection Whimsical de Paige Evans et Pink Paislee. J'ai réalisé un attrape-rêves avec des flocons en papier et je l'ai décoré avec des découpes et des autocollants de la collection. J'adore la douceur qui s'en dégage!


I had fun with the awesome Boys Rule line by Cocoa Vanilla Studio for this one. I really enjoyed combining this boy collection with a photo of my girls and layering all those stars!

Je me suis amusée avec la collection Boys Rule de Cocoa Vanilla Studio pour celle-ci. J'ai adoré associer cette collection masculine à une photo des filles et superposer toutes ces étoiles!


For this girly layout, I used the gorgeous Midnight collection by Cocoa Vanilla Studio. I cut the white die cut from the large die cut and backing kit in half and made a wreath with beautiful Midnight embellies.

Pour cette page féminine, j'ai utilisé la superbe collection Midnight de Cocoa Vanilla Studio. J'ai coupé la découpe du "large die cut and backing kit" en deux et j'ai fait une couronne avec de beaux embellissements de la collection.


I made this fall page using the Pick-Me-Up line by Paige Evans and Pink Paislee. I framed my sweet photo with stitched paper leaves and then adorned my layout with pretty Pick-Me-Up embellishments.

J'ai réalisé cette page d'automne avec la collection Pick-Me-Up de Paige Evans et Pink Paislee. J'ai encadré ma photo avec des feuilles en papier que j'ai cousues et que j'ai ornées de jolis embellissements de la collection.


This is the first layout I made with the Whimsical collection. I fussy cut chevrons and flowers in patterned papers and added a few embellies here and there. I love that purple ombre paper!

C'est la première page que j'ai faite avec la collection Whimsical. J'ai découpé des chevrons et des fleurs dans des papiers à motif et j'ai ajouté quelques embellissements ici et là. J'aime beaucoup ce papier de fond et son dégradé violet!


For this album, I used the beautiful Auburn Lane collection by Pink Paislee and documented our family trip to Italy last year. I'm not much of a mini album maker so I was happy with how it turned out!

Pour cet album, j'ai utilisé la belle collection Auburn Lane de Pink Paislee ainsi que des photos de notre voyage en Italie l'année dernière. Je n'avais pas fait de mini album depuis très longtemps et j'étais plutôt contente du résultat!


I went with black, white and orange for this layout using the More than Words collection by Cocoa Vanilla Studio. I made a scalloped spiral with paper half circles and adorned it with flowers and butterflies from the range.

J'ai réalisé cette page toute en orange, noir et blanc avec la collection More than Words de Cocoa Vanilla Studio. J'ai fait une spirale avec des demi-cercles en papier et je l'ai décorée avec des fleurs et des papillons de la collection.


For this sweet page, I played again with the More than Words collection and placed the embellies and the picture along the bottom right corner of the page. I like that fun design and that cute photo!

Pour celle-ci, je me suis à nouveau amusée avec la collection More than Words et j'ai regroupé les embellissements et la photo le long du coin inférieur droit de la page. J'aime cette mise en page et cette adorable photo!


I made this pretty in pink page with the More than Words line by Cocoa Vanilla Studio and a Halloween snap of my girls. I layered frames on the page and adorned them with beautiful embellishments from the collection. I just love that color combination!

J'ai réalisé cette page toute rose avec la collection More than Words de Cocoa Vanilla Studio et une photo des filles dans leurs déguisements d'Halloween. J'ai superposé des cadres sur ma page et je les ai ornés de beaux embellissements de la collection. J'adore cette association de couleurs!


Here I used the Auburn Lane collection by Pink Paislee and a fall photo of my girls. I placed fussy cut chevrons at the top and at the bottom of the page and topped them with the picture and some embellishments. How beautiful is that wood grain paper?

Ici, j'ai utilisé la collection Auburn Lane de Pink Paislee et une photo des filles prise lors d'une balade d'automne. J'ai placé des chevrons découpés dans un papier en haut et en bas de la page et je les ai surmontés de la photo et de quelques embellissements. Ce papier de fond effet bois est vraiment superbe!


I made this layout for Paper Issues' Scraplift Sunday using the Flourish collection by Maggie Holmes and Crate Paper and a sweet photo of my oldest girl back when she was 2 years old. I love those layered paper strips in the center of the page and the beautiful Flourish colors!

J'ai fait cette page pour le Scraplift Sunday de Paper Issues avec la collection Flourish de Maggie Holmes et Crate Paper et une photo de ma fille aînée à deux ans. J'aime beaucoup les bandes de papier superposées au centre de la page et les belles couleurs de la collection Flourish!


I played with the Pick-Me-Up line by Paige Evans and Pink Paislee to make these sweet baby cards. I topped my card panels with paper butterflies and hearts, used cute foam Thickers for the sentiment and I adorned them with Pick-Me-Up stickers, die cuts, buttons and sequins.

Je me suis amusée avec la collection Pick-Me-Up de Paige Evans et Pink Paislee pour réaliser ces adorables cartes de naissance. J'ai surmonté la base de mes cartes avec des cœurs et des papillons en papier, j'ai utilisé des Thickers en mousse pour le titre et je les ai décorées avec des autocollants, des die-cuts, des boutons et des sequins de la collection.


For this girly page, I used the Wild Child collection by Pink Paislee and a picture of my girls snapped during a walk a few years back. I layered two colorful papers for the background and placed all the embellies and the photo where the papers meet. So bright and fun!

Pour cette page acidulée, j'ai utilisé la collection Wild Child de Pink Paislee ainsi qu'une photo des filles prise lors d'une balade il y a quelques années. J'ai superposé deux papiers à motif colorés pour le fond et j'ai regroupé les embellissements et la photo à la jonction des deux papiers. J'adore la gaieté de cette page!


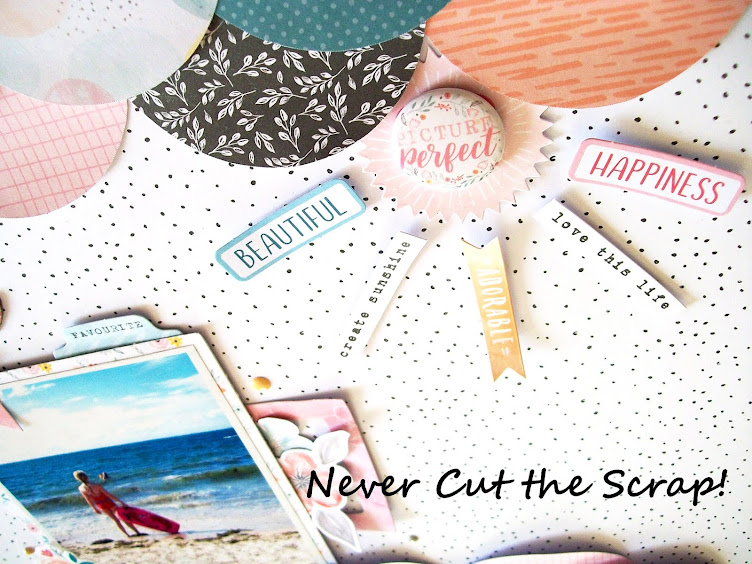
To go with my summer photo, I created a beach scene on my page with the beautiful More than Words collection by Cocoa Vanilla Studio. I placed half circles at the top and at the bottom of my layout for the sea and the sky and made a sun with a flair button, die cuts and stickers.

Pour aller avec ma photo de plage, j'ai voulu recréer une scène estivale sur ma page avec la belle collection More than Words de Cocoa Vanilla Studio. J'ai placé des demi-cercles en papier en haut et en bas de la page pour le ciel et la mer et j'ai fait un soleil avec un badge, des die-cuts et des autocollants.


Here I used the Pick-Me-Up collection to make a page all about my girls. I fussy cut beautiful flowers from a 12x12 paper and arranged them in a circle to create a wreath. I also made dangling ornaments with stickers, buttons, Thickers and a bit of stitching.

Sur celle-ci, j'ai utilisé la collection Pick-Me-Up et une photo des filles prise lors de notre voyage en Irlande. J'ai découpé de belles fleurs dans un papier à motif et je les ai disposées en cercle pour former une couronne. J'ai également fait des ornements qui pendent de la couronne avec des autocollants, des boutons, des Thickers et quelques points de couture.


I made this page for the Paper Issues January Notable Quotable challenge using several Maggie Holmes collections and a photo of my Frenchie wandering on the beach. I love those layers and those pretty colors!

J'ai fait cette page pour le Notable Quotable challenge de janvier de Paper Issues avec plusieurs collections de Maggie Holmes et une photo de ma bouledogue en promenade sur la plage. J'aime beaucoup tous ces papiers superposés à droite de la page et ces jolies couleurs!


Thank you so much for joining me today and for your support this year! Happy New Year's Eve! See you again next year!

Merci de vous être joints à moi aujourd'hui et tout au long de cette année! Bon réveillon et à l'année prochaine!


Elodie


jeudi 27 décembre 2018

Dream - Pink Paislee


Hi friends!

It's my turn to share a new project on the Pink Paislee blog today! I can't get enough of the beautiful Whimsical collection and I played with it again to make a soft page using a winter photo of my girls snapped during a walk on the beach a couple of years ago.

Bonjour à tous!

C'est à mon tour de partager un nouveau projet sur le blog de Pink Paislee aujourd'hui. Je ne me lasse pas de la belle collection Whimsical et je l'ai à nouveau utilisée pour réaliser une page tout en douceur avec une photo des filles en balade sur la plage il y a quelques hivers.


I love how happy and colorful the Whimsical line is. There is also a soft and delicate touch to it with its bits of light pink, purple, white, and gold. This is what I wanted to focus on here to create an airy and dreamy winter page.

J'aime beaucoup la gaieté de cette collection. Elle a également un côté délicat avec ses touches de rose clair, de violet, de blanc et de doré. C'est ce que j'ai voulu mettre en avant ici pour créer une page d'hiver pleine de douceur.


My idea was to make a dreamcatcher with paper snowflakes. I started by looking for a background and picked Paper 17. I'm swooning over that pink ombre pattern!

Pour cette page, j'ai voulu faire un attrape-rêves avec des flocons en papier. J'ai commencé par chercher un fond et j'ai opté pour le papier 17. J'adore ce dégradé de rose!


I moved on to making my snowflakes and punched a lot of them from Paper 15. I layered them in a circle at the top of the page and bent them up a bit before sticking them down for dimension. I then adorned my snowflake wreath with pretty Whimsical embellies: butterflies from the ephemera pack as well as cardstock and chipboard stickers.

Je me suis ensuite affairée à faire mes flocons et j'en ai perforés plusieurs dans le papier 15. Je les ai superposés en cercle en haut de la page et je les ai recourbés légèrement avant de les coller pour apporter du relief. J'ai ensuite orné ma couronne de flocons avec de beaux embellissements de la collection: des papillons de l'ephemera pack ainsi que des autocollants en cardstock et en chipboard.


I adhered my black and white picture in the wreath with foam squares and topped it with a flower from the floral embellishment pack, a cloud die cut, and a star sticker. I also tucked an ephemera piece and more lovely Whimsiacl flowers under it. For the title, I used a gold chipboard word that I placed on the snowflakes under the photo.

J'ai collé ma photo dans la couronne avec de la mousse 3D et je l'ai surmontée d'une fleur, d'un nuage de l'ephemera pack et d'une étoile autocollante. J'y ai également glissé un die-cut et d'autres jolies fleurs de la collection. Pour le titre, j'ai utilisé un mot en chipboard que j'ai placé sur les flocons sous la photo.


To complete my winter dreamcatcher, I hand stitched three lines coming down from the wreath to create dangling ornaments. I adhered a paper snowflake at the end of each line with foam squares and adorned my hand stitched lines with cute chipboard stickers. Finally, I added Whimsical and Auburn Lane enamel shapes around the wreath and my winter page was complete.

Pour compléter mon attrape-rêves, j'ai cousu trois lignes descendant de la couronne pour créer des ornements. J'ai collé un flocon en papier au bout de chaque ligne avec de la mousse 3D et j'ai décoré mes lignes avec des autocollants en chipboard. Enfin, j'ai terminé ma page hivernale en ajoutant des enamel shapes des collections Whimsical et Auburn Lane autour de la couronne.


Thanks so much for joining me today! I hope this layout inspires you to use the Whimsical collection on your winter projects!

Merci de vous être joints à moi aujourd'hui! J'espère que cette page vous donnera envie d'utiliser la collection Whimsical sur vos projets d'hiver!


Elodie


vendredi 21 décembre 2018

Christmas Cards


Hello there!

I'm popping in today to share a set of Christmas cards I made using the Turn the Page collection by Paige Evans and Pink Paislee. You can find one of them in the winter issue of Scrapbook and Cards Today!

Bonjour!

Je suis de passage aujourd'hui pour paratger des cartes de Noël réalisées avec la collection Turn the Page de Paige Evans et Pink Paislee. Vous pouvez retrouver l'une d'elles dans le numéro d'hiver du magazine Scrapbook and Cards Today!


I started by making the base of my cards and folded pink papers from the Turn the Page 6x6 paper pad in half. I love that fun size! I topped the card panels with rectangles that I cut in a couple of  6x6 papers and moved on to embellishing my cards. I went with the idea of shooting stars and got busy fussy cutting stars in the 6x6 paper pad. I placed paper and washi strips on the top of my cards and then added the stars on the coordinating strips. I also used pretty foam Thickers from the Auburn Lane collection for the sentiment and I adorned the stars with fussy cut flowers and stickers. Finally, I added a bit of sparkle and shine to my Christmas cards with gold and pink Auburn Lane sequins.

J'ai commencé par faire la base de mes cartes en pliant deux feuilles roses du paper pad Turn the Page en deux. J'ai surmonté mes bases avec des rectangles eux-aussi découpés dans le paper pad et je suis passée à la partie embellissement. Je suis partie sur l'idée d'étoiles filantes et j'ai donc découpé des étoiles dans une des feuilles du paper pad. J'ai ensuite placé des bandes de papier et de washi tape sur le dessus de mes cartes et j'ai ensuite ajouté chaque étoile sur la bande de la couleur correspondante. J'ai également utilisé des Thickers dorés de la collection Auburn Lane pour le titre et j'ai orné mes étoiles de fleurs en papier et d'autocollants. Enfin,  j'ai apporté une touche scintillante à mes cartes de Noël avec des sequins roses et dorés de la collection Auburn Lane.


Be sure to check out the winter issue of Scrapbook and Cards Today for more beautiful inspiration! You can find the free online version here
Thank you so much for stopping by! Merry Christmas to you all!

Vous pouvez retrouver le numéro d'hiver de Scrapbook and Cards Today gratuitement et en ligne ici!
Merci de vous être arrêté par ici! Je vous souhaite un joyeux Noël!


Elodie


lundi 17 décembre 2018

Christmas Unicorns - Pink Paislee


Hello again, friends!

I'm already back with a new project that is up today on the Pink Paislee blog. With Christmas just around the corner, I wanted to make a colorful and happy page with the gorgeous Whimsical collection and a fun photo of my girls in the unicorn outfits they got last Christmas.

Re-bonjour!

Je suis déjà de retour avec un nouveau projet que vous pouvez retrouver aujourd'hui sur le blog de Pink Paislee. Avec Noël qui approche à grands pas, j'ai voulu faire une page colorée et joyeuse avec la belle collection Whimsical ainsi qu'une photo des filles dans les costumes de licorne qu'elles ont eus à Noël dernier.


I love all the bright colors in the Whimsical line. They are great to create rainbow-colored projects. This is what I went for here to go with this picture of my cute unicorns. First I looked for a light background paper to be able to use bold colors on my layout and picked Paper 21. I then cut strips at the bottom of Paper 05, Paper 12, Paper 16, and Paper 19 and I placed them along the left border of the page.

J'adore les couleurs vives de cette collection. Elles sont parfaites pour créer des projets aux tons arc-en-ciel. C'est ce que j'ai voulu faire ici pour faire écho à cette photo de mes deux licornes. J'ai commencé par chercher un papier de fond clair pour pouvoir faire une page haute en couleurs et j'ai finalement opté pour le papier 21. J'ai ensuite découpé des bandes en bas des papiers 05, 12, 16 et 19 et je les ai placées le long du bord gauche.


To add a bit of Christmas spirit to my layout, I decided to use stars and got busy drawing some on Paper 19. With all its different colors and patterns, this paper is perfect to punch or cut out shapes. I cut the stars with craft scissors and arranged them in a circle on the left side of the page. I love the happy look those rainbow stars give to my layout!

Pour apporter un peu d'esprit de Noël à ma page, j'ai décidé d'utiliser des étoiles et j'en ai dessinées plusieurs sur le papier 19. Avec ses différentes couleurs et ses motifs variés, ce papier est parfait pour perforer ou découper des formes. J'ai coupé mes étoiles avec des ciseaux de précision et je les ai disposées en cercle à gauche de la page. J'aime beaucoup la gaieté qu'elles apportent à ma page!


I adhered the photo with foam tape over the paper strips on the left side of the page and I adorned it with a frame and a rainbow heart from the ephemera pack, a couple of cardstock stickers, and with pretty flowers from the floral embellishment pack. I then moved on to embellishing my paper stars and topped them with tone-on-tone chipboard and foam Thickers for the title. I also added more tone-on-tone embellies around the stars: die cuts, leaves from the floral embellishment pack, puffy stickers, and enamel shapes.

J'ai collé la photo avec de la mousse 3D sur les bandes en papier à gauche de la page et je l'ai ornée d'un cadre et d'un cœur de l'ephemera pack, de quelques autocollants en cardstock et de jolies fleurs de la collection. J'ai ensuite surmonté mes étoiles en papier de Thickers en chipboard et en mousse pour le titre. J'ai également ajouté des embellissements en ton sur ton autour des étoiles: des die-cuts, des feuilles du floral embellishment pack, des puffy stickers et des enamel shapes.


It's not Christmas without a bit of sparkle and shine! I added a gold ampersand die cut and a cute chipboard heart to my photo cluster and I put the finishing touch to my festive layout with a few droplets of gold ink.

Pas de Noël sans paillettes! J'ai ajouté une esperluette dorée de l'ephemera pack et un cœur en chipboard sur ma photo et j'ai apporté la touche finale à ma page festive avec quelques gouttes d'encre dorée.


Thank you so much for stopping by! I hope you are inspired to use the colorful Whimsical line on your Christmas projects. Happy holidays to you all!

Merci beaucoup de vous être arrêté par ici! J'espère que cette page vous donnera envie d'utiliser la collection Whimsical sur vos projets de Noël. Je vous souhaite de joyeuses fêtes!


Elodie


My 2018 Favourites - Cocoa Vanilla Studio


Hi everyone!

I'm kicking off a new week on the Cocoa Vanilla Studio blog today. It's also my last CVS post. I've loved being on this amazing team and playing with Zoe's gorgeous collection these past two years. For this last post and to celebrate the end of the year, I picked a couple of my favourite layouts I made this year using beautiful Cocoa Vanilla Studio supplies. Here they are!

Bonjour à tous!

Vous pouvez me retrouver aujourd'hui sur le blog de Cocoa Vanilla Studio avec mon dernier post pour la marque. J'ai adoré faire partie de cette équipe et créer avec les superbes collections de Zoe ces deux dernières années. Pour ce dernier post et pour fêter la fin de l'année, j'ai choisi trois de mes pages préférées réalisées en 2018 avec les beaux produits Cocoa Vanilla Studio. Les voici!


For this page, I used the More than Words collection and a summer snap of my oldest girl at the beach. To go with my photo, I decided to create a summery scene using half circles for the sea and the sky. I also made a sun using a flair button, accessory stickers and die cuts and I adorned my picture with More than Words flowers. CVS florals are always so beautiful!

Pour cette page, j'ai utilisé la collection More than Words et un cliché de ma fille aînée à la plage. Pour aller avec ma photo, j'ai voulu réaliser une scène estivale en utilisant des demi-cercles pour la mer et le ciel. J'ai également fait un soleil à l'aide d'un badge, d'autocollants et de die-cuts et j'ai décoré la photo avec des découpes florales de la collection. Les fleurs Cocoa Vanilla Studio sont toujours magnifiques!


I went with pink, black and white for this layout using a sweet Halloween photo of my girls and the More than Words collection. I layered frames at the top of the page and adorned them with gorgeous More than Words embellies. I placed the photo on the right side of my layout and added another chipboard frame under it. I topped a label with a cute flair button for the title and embellished the picture with More than Words cardstock and vellum flowers. I put the final touch to my monochromatic page with a few pink enamel dots. I love this color combination!

Ici aussi, j'ai utilisé la collection More than Words et j'ai associé du rose, du noir et du blanc à une jolie photo d'Halloween. J'ai superposé des cadres en haut de la page et je les ai décorés avec de beaux embellissements de la collection. J'ai placé la photo à droite de ma page et j'ai ajouté un autre cadre en chipboard juste en dessous. J'ai surmonté une étiquette d'un badge pour le titre et j'ai orné la photo de fleurs en cardstock et en calque. J'ai apporté la touche finale à ma page avec quelques enamel dots roses. J'adore cette association de couleurs!


For this layout, I played with the gorgeous Midnight collection and a photo of my girls snapped during our trip to Italy last year. I wanted to use the large die cut and backing kit in a fun way. So I cut the die cut in half and placed it on either side of the page. I adhered my picture in the center and decided to make a wreath all around it using pretty Midnight embellishments. Finally, I added a few droplets of black ink and my girly layout was complete. I like how soft and dreamy this page looks!

Pour faire cette page, j'ai utilisé la belle collection Midnight et une photo des filles prise en Italie l'année dernière. Je me suis amusée à découper la découpe du large die cut and backing kit en deux et j'ai placé les deux côtés de part et d'autre de la page. J'ai ensuite collé la photo au centre et j'ai décidé de faire une couronne tout autour avec des embellissements de la collection. Enfin, j'ai terminé ma page avec quelques gouttes d'encre noire. J'aime beaucoup la douceur de cette page!


Thank you so much for joining me today and for your support throughout this awesome adventure! And thank you to Zoe, Sue and the team for having me these two years!

Merci de vous être joints à moi aujourd'hui et de m'avoir suivie tout au long de cette belle aventure! Et merci à Zoe, Sue et toute l'équipe pour ces deux années passées ensemble!


Elodie


jeudi 6 décembre 2018

The Happy Life - Pink Paislee


Hi everyone!

It's my turn on the Pink Paislee blog today! I used the Paige Evans Whimsical collection to make a bright and happy page with a fall photo of my youngest daughter. The Whimsical colors are perfect for this happy autumn snap of my little one!

Bonjour!

C'est à mon tour de partager un nouveau projet sur le blog de Pink Paislee! J'ai utilisé la collection Whimsical de Paige Evans pour réaliser une page lumineuse avec une photo d'automne de ma petite dernière. Les couleurs de la collection vont parfaitement avec ce cliché plein de gaieté!


I don't have an electronic cutting machine so I was excited to play with the Whimsical specialty die cut background paper. I started by looking for a paper to back it with and chose Paper 05. How beautiful is that white floral background? I love those bright colors picking through!

Je n'ai pas de machine de découpe électronique et j'avais hâte d'utiliser ce papier de fond prédécoupé de la collection. J'ai commencé par chercher un papier pour le matter et j'ai finalement opté pour le papier 05. Ce fond floral blanc est magnifique! Et j'aime beaucoup les couleurs vives que l'on aperçoit ici et là!


I wanted to add more pretty Whimiscal flowers to the background and fussy cut some from Paper 03. I then placed them on the edges of my layout, bent them up a bit, and adhered some of them with foam squares to give even more dimension to the page.

Je voulais ajouter d'autres jolies fleurs de la collection sur le fond et j'en ai découpées quelques-unes dans le papier 03. Je les ai placées sur les bords de la page, j'ai recourbé leurs bords et j'en ai collées certaines avec de la mousse 3D pour encore plus de volume.


Time to add the photo! I adhered it with foam tape to make it pop and then adorned it with flowers from the floral embellishment pack, a cardstock sticker, and a banner die cut cut in half and then placed on either side of the picture.

J'ai ensuite ajouté la photo que j'ai collée avec de la mousse 3D pour la faire ressortir et je l'ai ornée de fleurs du floral embellishment pack, d'un autocollant en cardstock et d'une bannière découpée en deux et placée de chaque côté de la photo.


For the title, I used a chipboard sticker that I placed along one of the background flowers just under the photo. I also added a couple of cute butterflies from the ephemera pack and topped them with tone-on-tone enamel hearts.

Pour le titre, j'ai utilisé un autocollant en chipboard que j'ai placé le long d'une des fleurs du fond sous la photo. J'ai également ajouté deux jolis papillons de l'ephemera pack que j'ai surmontés de cœurs autocollants ton-sur-ton.


I completed my fall layout by embellishing some of the background flowers with lovely leaves from the floral embellishment pack and with a few enamel dots. These are great to bring extra detail and texture to a project!

J'ai terminé ma page d'automne en embellissant quelques fleurs du fond avec des feuilles du floral embellishment pack et quelques enamel dots. Ceux-ci sont parfaits pour apporter du détail et de la texture à un projet!


Thanks so mcuh for joining me today! I hope you are inspired to add color and dimension to your layouts using the beautiful Whimsical line!

Merci de vous être joints à moi! J'espère que je vous ai donné envie d'apporter de la couleur et du relief à vos pages avec la belle collection Whimsical!


Elodie


lundi 3 décembre 2018

Happy and Bright Cards - Cocoa Vanilla Studio


Hello crafty friends!

Happy Monday! I have a new project up on the Cocoa Vanilla Studio blog today. I played with the gorgeous Midnight collection and made a set of Christmas cards. I love the soft and dreamy look the beautiful Midnight colors give them!

Bonjour à tous!

Je commence la semaine avec un nouveau projet que vous pouvez retrouver aujourd'hui sur le blog de Cocoa Vanilla Studio. J'ai utilisé la superbe collection Midnight pour réaliser des cartes de Noël. J'adore la douceur que leur apportent les belles couleurs de la collection!


I started by making the base of my cards using papers from the 6x8 paper pad that I folded in half to get 6x4 cards. So easy and handy! I then cut rectangles in more 6x8 papers and placed them on the top of my cards.

J'ai commencé par faire les bases de mes cartes avec des feuilles du paper pad Midnight que j'ai pliées en deux. Simple et pratique! J'ai ensuite découpé des rectangles dans d'autres feuilles du paper pad et je les ai placées sur le dessus des cartes.


To give them a wintery look, I decided to use snowflakes and punched a lot of them in papers from the 6x8 paper pad. I then layered my paper snowflakes at the top of one of the cards and at the bottom of the other one. I adhered some of them with foam squares and bent them up a bit for dimension.

Pour leur apporter un petit côté hivernal, j'ai décidé d'utiliser des flocons de neige et j'en ai perforé plusieurs dans quelques feuilles du paper pad. J'ai ensuite superposé mes flocons en papier en haut de la première carte et en bas de la seconde. J'en ai collé quelques-uns avec de la mousse 3D et j'ai recourbé leurs bords pour plus de volume.


For the sentiments, I used pretty die cut titles that I placed on the snowflakes. Here again, I adhered them with foam squares to make them pop. I added a few more snowflakes on each card and then moved on to embellishing.

Pour les titres, j'ai utilisé des découpes du die cut titles pack et je les ai placés sur les flocons. Une fois encore, je les ai collés avec des carrés de mousse 3D pour mieux les faire ressortir. J'ai ajouté quelques flocons supplémentaires sur chacune des cartes et je suis passée à la partie embellissement.


I topped some snowflakes with accessory stickers and cute chipboard hearts and I added a clear sticker on the "Happy" card for extra detail. I also had to include Midnight florals on my cards and tucked beautiful flowers and leaves from the ephemera pack under the sentiments. Last but not least, I added a bit of sparkle and shine to my Christmas cards with a few white and blue sequins from my stash.

J'ai surmonté quelques flocons d'autocollants en cardstock et de jolis petits cœurs en chipboard et j'ai ajouté un autocollant transparent sur la carte "Happy" pour apporter un peu plus de détail. Il fallait aussi que j'utilise les belles fleurs de la collection et j'en ai glissées quelques-unes sous les titres. Enfin, j'ai ajouté une petite touche scintillante à mes cartes de Noël avec quelques sequins blancs et bleus.


I can't get enough of the beautiful Midnight collection! It's perfect to create soft and delicate projects. I hope you are inspired to use it on your Christmas cards and layouts! Thanks so much for joining me today! Have a lovely day!

Je ne me lasse pas de la collection Midnight! Elle est parfaite pour créer des projets doux et délicats. J'espère que ces cartes vous donneront envie de l'utiliser sur vos pages et vos cartes de Noël! Merci de votre visite et bonne journée!


Elodie


mardi 27 novembre 2018

Enjoy The Moment - Pink Paislee


Hello everyone!

I'm sharing a new layout on the Pink Paislee blog today. I played with the super pretty Whimsical collection and made a colorful fall page using mainly patterned papers and a photo of my youngest daughter snapped during an October walk a few years back. The Whimsical line is perfect to showcase pictures of my happy girl!

Bonjour à tous!

Vous pouvez me retrouver aujourd'hui avec un tout nouveau projet sur le blog de Pink Paislee. Je me suis amusée avec la très jolie collection Whimsical et j'ai fait une page d'automne colorée avec principalement des papiers à motif ainsi qu'avec une photo de ma petite dernière prise lors d'une balade il y a quelques années. La collection Whimsical s'accorde parfaitement avec les photos de ma petite madame bonheur!


For this layout, I wanted to use the colorful rectangles from Paper 19. I started by cutting them out and I layered them at the bottom of Paper 16. How cute are those rainbow hearts? I bent the rectangles up a bit before sticking them down to add dimension to the page.

Pour cette page, j'avais envie d'utiliser les rectangles colorés du papier 19. J'ai commencé par les couper et je les ai superposés en bas du papier 16. J'adore ces cœurs aux couleurs de l'arc-en-ciel! J'ai recourbé légèrement mes rectangles avant de les coller pour apporter du volume à la page.


Next I topped my paper rectangles with two strips that I cut at the bottom of Paper 01 and Paper 16. I love all those bright colors popping off from the page!

J'ai ensuite ajouté deux bandes découpées en bas des papiers 01 et 16 au dessus de mes rectangles en papier. J'aime beaucoup toutes ces couleurs vives qui se détachent du fond clair!


I adhered the photo at the top of my layout with foam squares to make it stand out from the colorful background. I then adorned it with cute speech bubbles that I fussy cut in Paper 18.

J'ai collé la photo en haut de ma page avec de la mousse 3D pour la faire ressortir sur le fond coloré. Je l'ai ensuite ornée de bulles découpées dans le papier 18.


I also had to include Whimsical flowers on my page and I fussy cut some in Paper 03 and Paper 14. I then arranged them at the top of my layout around the picture. I just can't get enough of those beautiful flowers!

Il fallait absolument que j'inclue des fleurs de la collection sur ma page. J'en ai donc découpées quelques-unes dans les papiers 03 et 14 et je les ai disposées en haut de la page autour de la photo. Je suis fan de ces jolies fleurs!


For the title, I used rub-ons that I placed on one of the paper rectangles under the photo. Finally, I added fussy cut leaves from Paper 14 on a couple of rectangles and my fall layout was complete. I had so much fun putting this page together with the Whimsical papers and I love how happy it looks!

Pour le titre, j'ai utilisé des rub-ons que j'ai placés sur un des rectangles en papier sous la photo. Enfin, j'ai terminé ma page d'automne en ajoutant des feuilles découpées dans le papier 14 sur quelques rectangles. J'ai beaucoup aimé faire cette page avec les papiers Whimsical et j'adore sa touche colorée et joyeuse!


Thank you so much for stopping by! I hope this layout inspires you to play with the beautiful Whimsical patterned papers!

Merci de vous être arrêté par ici! J'espère que cette page vous donnera envie de vous amuser avec les beaux papiers de la collection Whimsical!


Elodie